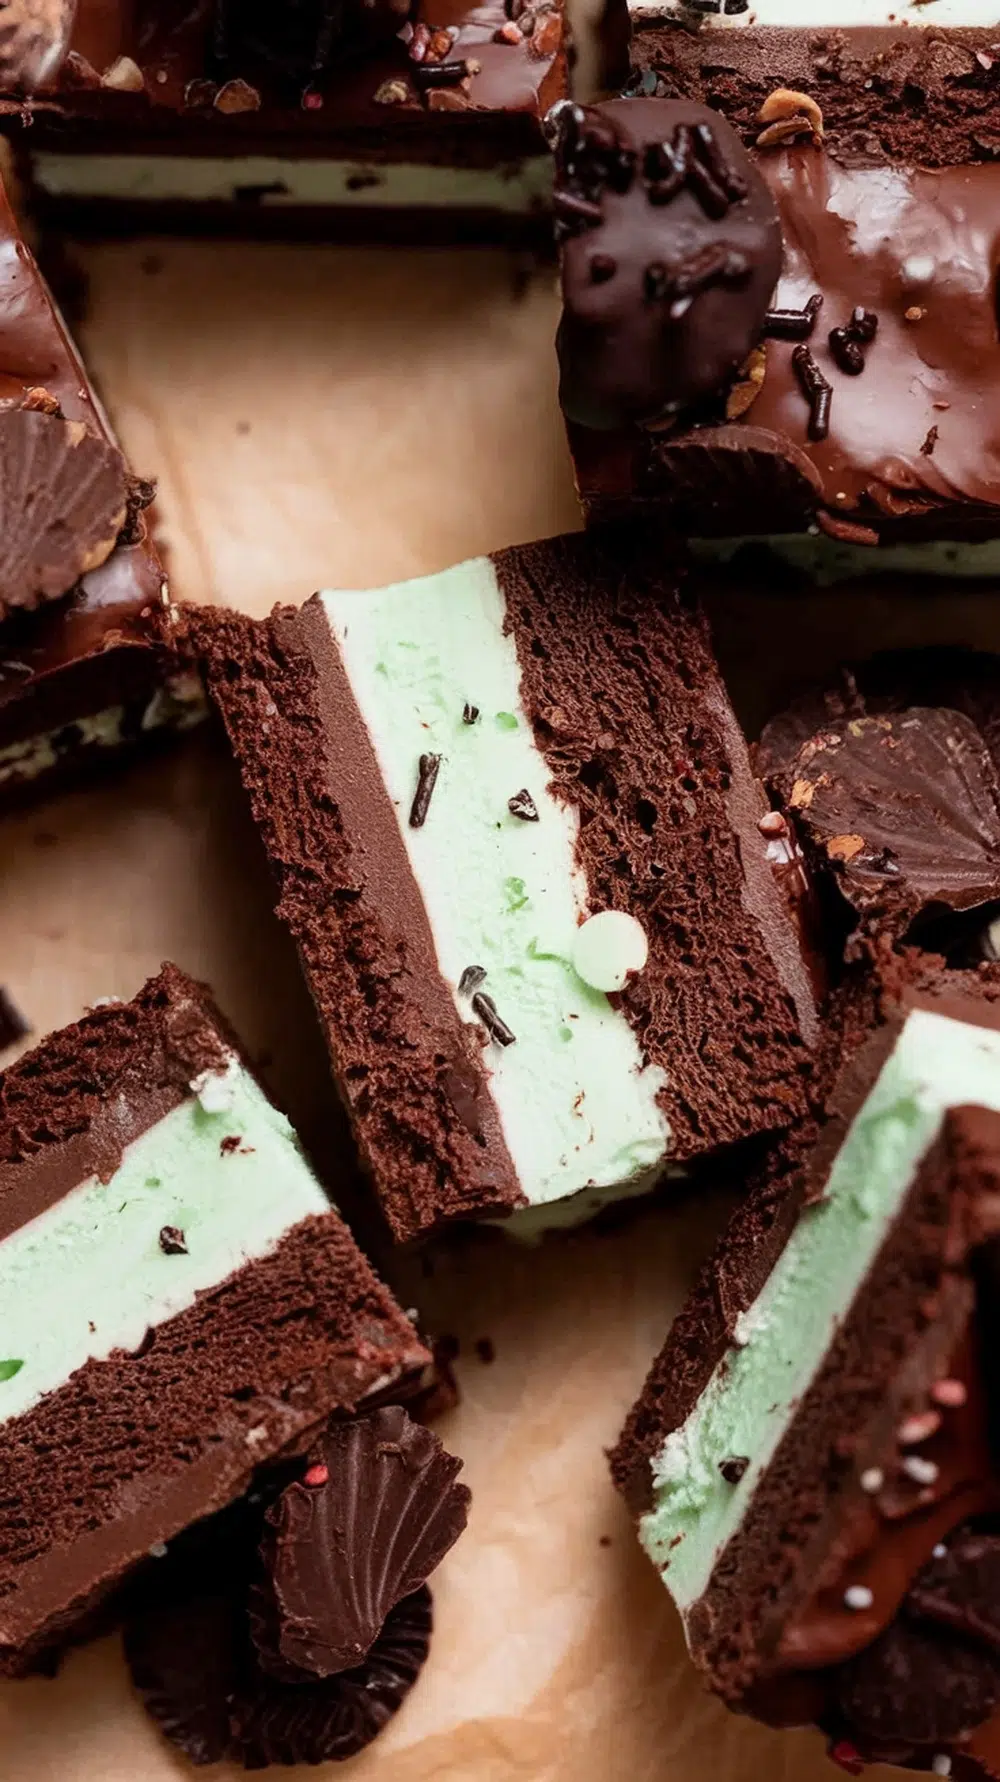
Mint Chocolate Chip Ice Cream Cake is more than just a frozen dessert—it’s a nostalgic, crowd-pleasing treat that blends the coolness of mint with the richness of chocolate in a way that’s hard to resist. With its dreamy layers of soft chocolate cake, refreshing mint chip ice cream, and a silky ganache topping, it hits all the right notes for texture and flavor.
Whether you’re celebrating a summer birthday or just craving something sweet and cold, this mint chocolate chip ice cream cake is the perfect make-ahead dessert. It’s indulgent yet refreshing, simple to assemble, and guaranteed to disappear fast from any dessert table. In this ultimate guide, we’ll break down each step to help you make it perfectly every time—along with expert tips, ingredient swaps, and delicious variations.
Table of Contents
WHY WE LOVE MINT CHOCOLATE CHIP ICE CREAM CAKE
There’s something irresistible about mint chocolate chip ice cream cake—it’s cool, rich, and always hits the spot. The fresh burst of mint combined with smooth chocolate chunks creates a flavor contrast that’s both refreshing and indulgent. It’s the kind of dessert that feels fancy without the fuss.
We love it because it’s a nostalgic favorite that never goes out of style. It’s perfect for warm weather, birthdays, or just because. Unlike traditional cakes, this one doesn’t require frosting or complex decorating—just simple layers of cake, ice cream, and ganache. Every bite offers a mix of creamy, crunchy, and fudgy textures, making it completely crave-worthy.
What really makes mint chocolate chip ice cream cake shine is its balance. It’s sweet but not too sweet. Cool but not icy. Rich but not heavy. It satisfies both chocolate lovers and mint fans alike—bringing everyone to the dessert table with a smile.
Ingredient Notes and Substitutions
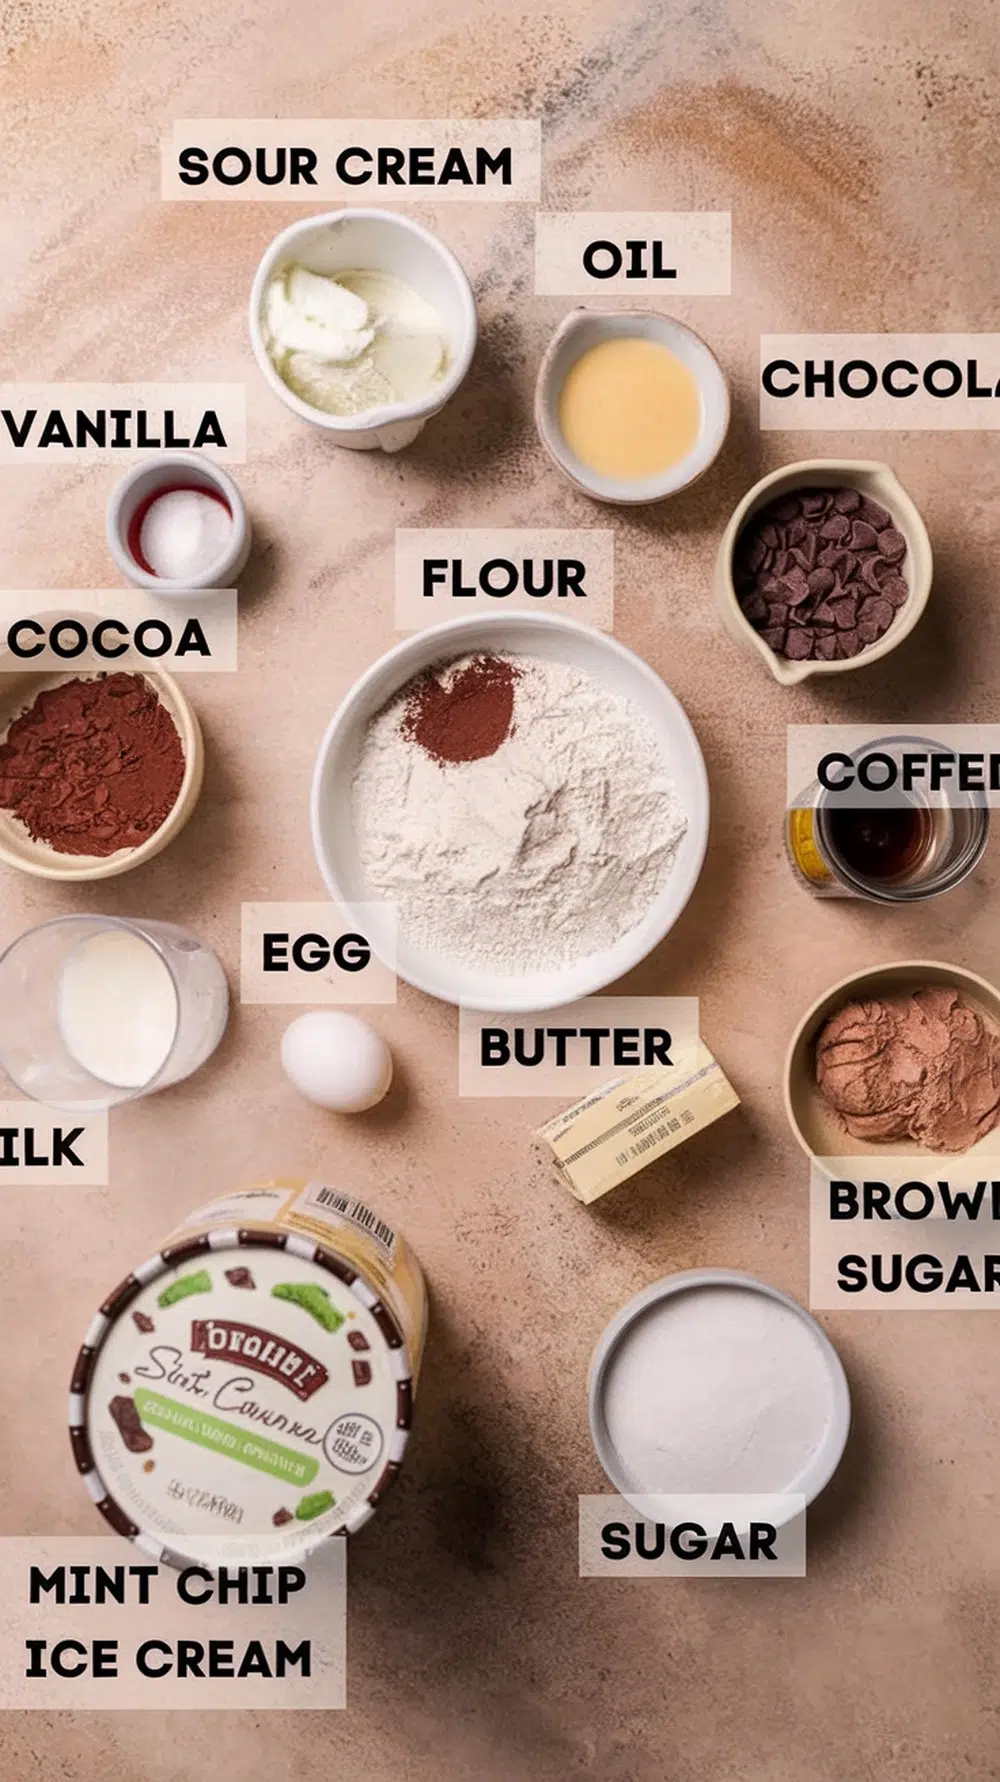
The secret to a rich, indulgent mint chocolate chip ice cream cake lies in using simple, high-quality ingredients. This recipe combines a moist chocolate cake, a layer of creamy mint chip ice cream, and a silky ganache topping—all made from scratch or elevated with easy-to-find ingredients.
Chocolate Cake Layer
This layer acts as the rich, fudgy base for the entire cake.
- 1 cup (125g) all-purpose flour
- ¾ cup (150g) granulated sugar
- ⅓ cup (27g) unsweetened cocoa powder
- 1 teaspoon baking powder
- ½ teaspoon baking soda
- ¼ teaspoon salt
- ½ cup (120g) buttermilk, room temperature
- 1 large egg, room temperature
- ¼ cup (50g) neutral oil (canola or vegetable oil)
- ½ cup (120g) hot water
- 1 teaspoon vanilla extract
Mint Ice Cream Layer
Choose a high-quality store-bought ice cream or homemade if preferred. Soften slightly before using.
- 1.5 quarts mint chocolate chip ice cream (softened)
Ganache Topping
A smooth ganache seals the top with a rich chocolate finish.
- 1½ cups (255g) semi-sweet chocolate chips
- ¾ cup (180g) heavy cream
Optional Toppings (Customizable)
Add some crunch, texture, or flair to make your mint chocolate chip ice cream cake truly your own:
- Crushed chocolate sandwich cookies (like Oreos)
- Mini chocolate chips
- Chopped Andes mints or peppermint bark
- Fresh mint leaves
- Whipped cream for serving
- Chocolate shavings or sprinkles for decoration
Using simple pantry staples and your favorite brand of ice cream, you can make a homemade mint chocolate chip ice cream cake that’s even better than store-bought. The flavor is bold, the texture is perfect, and the layers stay beautifully intact when sliced and served.
Step-by-Step Instructions for Making Mint Chocolate Chip Ice Cream Cake
1. Bake the Chocolate Cake
- Preheat your oven to 350°F (177°C). Grease an 8-inch round cake pan and line the bottom with parchment paper.
- In a large bowl, whisk together the flour, sugar, cocoa powder, baking powder, baking soda, and salt.
- Add in the buttermilk, egg, oil, vanilla, and hot water. Whisk until smooth and combined.
- Pour the batter into the prepared cake pan.
- Bake for 22–25 minutes, or until a toothpick inserted in the center comes out clean.
- Let the cake cool completely, then freeze the cake layer for at least 30 minutes.
2. Add the Ice Cream Layer
- Let the mint chocolate chip ice cream soften at room temperature for 10–15 minutes.
- Place the frozen cake layer into a springform pan or build a tall acetate cake collar around the cooled cake.
- Spoon the softened ice cream on top and spread it evenly using an offset spatula.
- Freeze the assembled cake for at least 4–6 hours, or until the ice cream is fully set.
3. Make the Chocolate Ganache
- In a heatproof bowl, add the chocolate chips.
- Heat the heavy cream in a small saucepan over medium heat until just simmering.
- Pour the hot cream over the chocolate chips and let it sit for 2–3 minutes.
- Stir until completely smooth and glossy.
- Let the ganache cool to room temperature before using.
4. Top and Set
- Pour the cooled ganache over the frozen ice cream layer.
- Use a spoon or spatula to gently spread it across the top. Let it drip slightly down the sides if desired.
- Freeze the entire cake again for at least 1 more hour before serving.
5. Serve and Store
- Let the cake sit at room temperature for 5–10 minutes before slicing.
- Use a sharp knife dipped in hot water for clean slices.
- Store leftovers in the freezer wrapped tightly in plastic wrap or in an airtight container for up to 2 weeks.
Tools and Equipment You’ll Need
To create a bakery-quality mint chocolate chip ice cream cake at home, having the right tools can make all the difference. While this dessert doesn’t require complicated equipment, using a few key items will help ensure each layer sets perfectly, slices cleanly, and looks professionally made.
Must-Have Tools
- 8-inch round cake pan – For baking the chocolate cake base. A springform pan works great if you want to build and release the cake easily.
- Parchment paper – To line the pan for easy cake removal and to avoid sticking.
- Mixing bowls – You’ll need a few different sizes for mixing the cake batter and making the ganache.
- Whisk and spatula – For mixing and spreading layers evenly.
- Offset spatula – Ideal for smoothing the ice cream and ganache layers cleanly and evenly.
- Measuring cups and spoons – Precision matters in baking, so accurate measuring tools are essential.
- Saucepan – Used to heat the cream for your chocolate ganache.
- Knife and bench scraper – A sharp knife (warmed under hot water) is best for slicing clean pieces, and a scraper helps with leveling sides.
Helpful (But Optional) Extras
- Springform pan or acetate cake collar – Makes assembling and releasing the cake much easier, especially when layering the ice cream.
- Electric mixer – Speeds up mixing but isn’t required.
- Cake turntable – Helpful if you want to decorate or smooth sides evenly.
- Digital kitchen scale – For bakers who prefer precise, weight-based measurements.
With just a few reliable kitchen tools, you’ll be equipped to build a beautiful mint chocolate chip ice cream cake that freezes well, slices clean, and looks like it came straight from a professional bakery.
Tips for Success – Avoid Common Mistakes
Even though mint chocolate chip ice cream cake is a relatively simple dessert, small missteps can impact the final look and flavor. Follow these pro tips to keep your layers clean, your texture perfect, and your ice cream cake worthy of any celebration.
Preventing Ice Cream Melt Disasters
- Freeze between steps: After baking the cake, let it cool completely and then freeze it before adding the ice cream. This keeps your base firm and prevents melting into a mess.
- Soften ice cream properly: Leave it out for 10–15 minutes before spreading. If it’s too frozen, it won’t spread evenly; too soft, and it can melt into the cake.
- Work fast: When assembling layers, work quickly to minimize melting. Keep your ice cream in the freezer until the last possible moment.
- Chill your tools: For best results, place your mixing bowl and spatula in the freezer for 10 minutes before spreading the ice cream layer.
Getting Perfect, Clean Layers Every Time
- Use an offset spatula: It helps you spread each layer evenly and avoid gouging into the one below it.
- Level the cake: If your baked cake domes, level the top with a knife before layering. This ensures the ice cream sits flat and doesn’t slide.
- Use a springform pan or cake collar: This keeps the layers aligned as they freeze and helps with clean release when you’re ready to serve.
- Freeze after every layer: Allow each stage—cake, ice cream, ganache—to chill and set fully before moving to the next. This maintains sharp, defined layers.
Additional Tips for Success
- Use quality ice cream: Premium brands have better texture and flavor, making a noticeable difference.
- Wipe your knife between cuts: Use a clean, hot knife for each slice to keep your presentation sharp and professional.
- Plan ahead: This cake needs several freeze times. Start a day in advance to avoid rushing through critical steps.
Mastering these tips will help you avoid the most common mistakes and ensure your mint chocolate chip ice cream cake turns out with smooth layers, great texture, and lasting shape—even at room temp.
Frequently Asked Questions
What extract is used in mint chocolate chip ice cream?
Most mint chocolate chip ice creams use peppermint extract to achieve that signature cool, fresh flavor. Spearmint extract is less common, as it offers a sweeter and more herbal taste. If making it from scratch, always start with peppermint extract and add a small amount at a time—it’s very potent.
What are the ingredients in Baskin Robbins mint chocolate chip ice cream?
According to Baskin Robbins, their mint chocolate chip ice cream includes milk, cream, sugar, corn syrup, peppermint flavor, and chocolate flakes, along with stabilizers and food coloring to give it that classic green hue. It’s a smooth, sweet base with just the right chocolate crunch in every bite.
What are the little Crunchies in ice cream cake?
The “crunchies” in ice cream cakes are usually made from a combination of chocolate cookie crumbs and a hardened fudge layer. They add texture and contrast to the creamy and soft ice cream layers. Some versions use crushed Oreos or chocolate wafers for a homemade touch.
What pairs well with mint chocolate chip ice cream?
Mint chocolate chip ice cream pairs beautifully with dark chocolate, vanilla sponge cake, hot fudge, whipped cream, or fresh berries like raspberries or strawberries. The refreshing mint flavor balances richer, denser sweets and even some citrus elements for a fresh contrast.
Can I make mint chocolate chip ice cream cake ahead of time?
Absolutely. This cake is actually best when made ahead. Mint chocolate chip ice cream cake needs time to freeze properly between layers and again after final assembly. You can make it 2–3 days in advance and store it in the freezer wrapped tightly in plastic wrap or in an airtight container.
What’s the best way to cut and serve mint chocolate chip ice cream cake?
Let the cake sit at room temperature for about 5–10 minutes before slicing. Then, use a sharp knife warmed under hot water, wiping it clean between cuts. This helps you achieve smooth, clean slices without cracking the ganache or dragging through the layers.
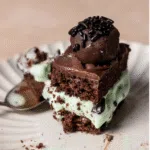
Mint Chocolate Chip Ice Cream Cake
- Total Time: 7 hours 58 minutes
- Yield: 15 servings 1x
Description
This mint chocolate chip ice cream cake is a delicious ice cream cake layered with chocolate cake, creamy ganache, and mint chocolate chip ice cream. It’s an easy summer dessert to enjoy on a hot summer day or that can be enjoyed all year long!
Ingredients
- 1 cup cake flour, *see notes for measuring*
- 3/4 cup granulated sugar
- 1/4 cup dark brown sugar, packed
- 3/4 teaspoon baking powder
- 1/4 teaspoon baking soda
- 1/2 teaspoon fine sea salt
- 3 tbsp cubed unsalted butter, room temperature
- 1/2 cup sour cream, room temperature
- 2 tbsp vegetable or canola oil
- 1 large egg, room temperature
- 1/4 cup whole milk, room temperature
- 1 tsp vanilla extract
- 1/3 cup hot coffee
- 1/3 cup unsweetened Dutch cocoa powder
- 1.4 quart mint chocolate chip ice cream tub
Ganache
- 3/4 cup heavy whipping cream
- 1 1/8 cup semi-sweet chocolate chips
Chocolate Truffles
- 1 ¾ cup cake crumbs, from the cut top
- 1/4 cup + 1 tbsp semi-sweet chocolate chips
- 2 tbsp heavy whipping cream
- 1/2 cup semi-sweet chocolate bar, chopped, for dipping the truffles
Instructions
Make the Batter
- Preheat the oven to 350 F/180 C. Line an 8-inch metal square pan** (see notes below) with parchment paper and set aside.
- In a stand mixing bowl, combine the dry ingredients. Mix in the butter for 3 minutes on low speed until it resembles coarse sand.1 cup (115 g) cake flour,3/4 cup (150 g) granulated sugar,1/4 cup (50 g) dark brown sugar,3/4 teaspoon baking powder,1/4 teaspoon baking soda,1/2 teaspoon fine sea salt,3 tbsp (42 g) cubed unsalted butter
- Mix in the sour cream and oil until combined. It should be a very thick paste.1/2 cup (113 g) sour cream,2 tbsp (23 g) vegetable or canola oil
- In a bowl with a spout, whisk together the eggs, milk, and vanilla. In a separate bowl, whisk together the HOT coffee and cocoa powder.1 (50 g) large egg,1/4 cup (56 g) whole milk,1 tsp vanilla extract,1/3 cup (95 g) hot coffee,1/3 cup (37 g) unsweetened Dutch cocoa powder
- Stream in the egg/milk mixture then immediately follow with the coffee/cocoa mixture, mixing until just combined. Scrape down the bowl. Then pour the chocolate batter into the pan. Bake for 28-35 minutes, or until a toothpick inserted into the center comes out mostly clean, with a few moist crumbs.
- Cool the pan on a wire rack for 20 minutes, then remove it from the pan and chill it in the freezer. This will make it easier to cut!
Make the Ganache
- Warm the cream, then pour it over the bowl of chocolate chips. Let it sit for 1 minute, then stir to emulsify. Set aside to cool.1 1/8 cup (185 g) semi-sweet chocolate chips,3/4 cup (165 g) heavy whipping cream
Assembly
- Line the 8×8 pan with plastic wrap to cover all four sides.
- Use a sharp serrated knife to cut off the top of the cake so that it is 1 inch tall. Then cut it in half horizontally. You will have two layers that are both roughly 1/2 inch thick. Set the cake crumbs aside to use later.
- Place the top cake layer into the lined pan. Pour half of the ganache over the top. Chill the pan in the freezer for at least 20-30 minutes, or until the ganache feels very firm. Then take the ice cream out of the freezer and take the top off. It should soften in about 20-25 minutes depending on how firm it is.1.4 quart mint chocolate chip ice cream tub
- When the ice cream is a spreadable consistency, take the pan out of the freezer and spread a little more than half of the container on top of the ganache. There should be about 1 inch of room to the top of the pan. Return the pan to the freezer for 1 hour, or until firm. Meanwhile, make the truffles.
- Heat the chocolate chips and heavy cream in the microwave for 15-30 seconds, stirring to combine. Pour the ganache into a bowl with the cake crumbs and mix. Chill the bowl in the fridge for 20 minutes to firm, then scoop the truffle mixture into 1 tbsp-sized balls. Place them on a parchment-lined baking tray.1 ¾ cup cake crumbs,1/4 cup + 1 tbsp (50 g) semi-sweet chocolate chips,2 tbsp heavy whipping cream
- Melt the chopped chocolate bar in 15-second intervals, stirring after each one. Stick a thermometer into the melted chocolate, it should stay between 88-90 F. Working quickly, toss each truffle ball into the chocolate until evenly coated then remove it with a fork and place it back on the tray. Sprinkle the tops with chocolate sprinkles. Then chill the truffles in the fridge until ready to use.1/2 cup (80 g) semi-sweet chocolate bar
- When the ice cream layer is firm, place the second cake layer on top. Spread the remaining ganache over the top. If it is too firm, gently warm it in the microwave for 5-10 seconds until spreadable but not warm. Then place the truffles on top.
- Freeze the cake for a minimum of 4 hours. Then lift it out of the pan with the plastic wrap. Cut into servings and enjoy!
Notes
Clear freezer space. Before you start, make sure to clear out ample space for the cake pan to be in and out of the freezer.
Pan size: This recipe is best with a square-edge metal baking pan. Pans that are ceramic, glass, or with rounded edges will not have the same depth needed for layering. You can alternately use a round 8″ spring-form pan.
Note: Not all mint chip ice cream brands are green! Tillamook is one brand that is white, not green. I recommend Baskin Robbins, Ben and Jerry’s, or Dreyers for green-tinted options.
Additions and variations. The cake truffles are optional, but put the cake crumbs to good use! You can also decorate it with shaved chocolate, chocolate chips, a drizzle of chocolate fudge, or chocolate ganache, or leave it plain. If you prefer a more minty flavor, add 1 teaspoon of good-quality peppermint extract to the cake batter with the eggs.
- Prep Time: 7 hours 30 mins
- Cook Time: 28
- Category: Dessert
- Method: Mexing
- Cuisine: American
Nutrition
- Serving Size: 15 servings